Showing posts with label appetizers. Show all posts

Saturday, June 16, 2012

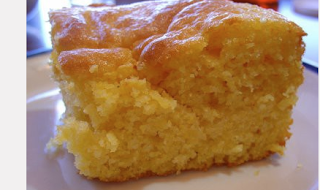
The Best Cornbread Ever


This recipe is literally the easiest and most delicious cornbread I've ever tasted! It's supposedly a mock recipe of Boston Market's cornbread. If you've ever eaten at Z'Tejas, it tastes very similar to their skillet cornbread. Melt in your mouth! It's the perfect combination of sweetness and corn.

Ingredients for an 8 in round pan:
- 1 box of Jiffy cornbread mix
- 1 box of Jiffy yellow cake mix

Ingredients for 9x13 pan:
- 2 boxes of Jiffy cornbread mix
- 1 regular yellow cake mix (the normal Betty Crocker size, not Jiffy)

Directions:
Simply mix both boxes according to the directions and combine the batter. You can use a large mixing bowl and combine both boxes of mix and all other ingredients at once. Bake at 350 degrees until done, about 30 minutes. Yum!

  Get Cookin'!

Monday, February 6, 2012

Grilled Avocados


I skipped Crock Pot Monday this week because of the Super Bowl...I just didn't get to the store! So I thought I'd share a simple and easy favorite of mine. This is so quick and SO good! I thought that grilling an avocado would make it mushy but it doesn't. But you have to put the olive oil and lime juice; we tried it once without it and the avocado burned. We like to put a dollop of sour cream in the avocado- but a good friend of mine also puts a little salsa on top of the sour cream and she loves it! I will be trying that soon. If you like avocados you will love this! It gives them a whole new taste. Try it and you will see!

Ingredients:
- avocado halves
- lime juice
- olive oil
- salt and pepper

Directions:
1) Cut all the way around the avocado but do not cut through the seed. Once you have cut all the way around, twist the 2 pieces until they come apart. Stab the seed with a knife and trash it.
2) Now you should have 2 avocado halves with the skin still on and a hole where the seed was originally. Sprinkle the halves with olive oil, limes juice, salt and pepper.
3) Grill meat down for 3-5 minutes on about medium heat. Remove when grill lines start to appear.
4) Top with sour cream and enjoy!

  Get Cookin'!

Friday, December 16, 2011

Grilled Meatballs


I saw this recipe online and I thought it was a neat idea. Perfect appetizer for a "grill-out." I was a little nervous about how the ground beef would cook without totally burning the bacon- but it was fine and both Jason and I ended up really enjoying these!

Ingredients:
- lean ground beef
- bacon
- 1 red onion, chopped fine
- 1 jalapeno, seeded and chopped fine
- 1/2 cup of seasoned breadcrumbs
- seasoning: Montreal steak seasoning, Worcestershire sauce, Tony's, garlic powder
- You will also need toothpicks

Directions:
1) Soak the wooden toothpicks in water while preparing the meatballs.
2) Spread the ground meat out on a plate and sprinkle the breadcrumbs over it.
3) Add the seasoning, onion, and jalapeno and mix altogether.
4) Roll 2 inch (approximately) meatballs and wrap with bacon- use a toothpick to secure bacon.
5) Grill for about 10 minutes, or until bacon is crisp.
6) Voila!

  Get Cookin'!

Thursday, November 3, 2011

Baked Asparagus Fries


Originally this recipe was meant for zucchini spears and I think I will try it with some soon. I just had a bushel of asparagus and thought, "What the heck!? Try it." They were really good! However next time I will look for a bushel with spears that are a little more thick. The asparagus I had were a little thin so they didn't turn out very crispy.

Jason made a delicious teriyaki ranch dipping sauce to go with the asparagus. Delish!

Ingredients:
- a bushel of asparagus or about 1 pound of zucchini
- 1 cup of Italian-seasoned panko bread crumbs (the Japanese style bread crumbs)
- 2 eggs

Directions:
1) Preheat the oven to 425 degrees.
2) Whisk the 2 eggs together in a shallow pie plate and set aside. Put the bread crumbs in another pie plate and set aside.
3) Cut about 1 inch off of the asparagus spears and rinse. Or if you're using zucchini, cut the ends off and the cut them into spears.
4) Dip the spears into the eggs and let excess drip off. Then roll in the bread crumbs and place on a baking sheet. Repeat until all spears are covered.
5) Bake for 10 minutes, remove from oven, flip, and bake for another 10 minutes.
6) Serve immediately. Voila!

  Get Cookin'!

Tuesday, October 25, 2011

Zesty Grilled Wings


We had a few wings and drumsticks so we decided to grill them tonight for dinner. The wings were so simple and so DELISH! This was (literally) a 30 minute meal that we will cook again soon. Jason's reaction to the wings during dinner was my favorite, "Dude....this was the best idea everrrrr!" Haha.

Ingredients:
** I don't have exact amounts because we just "eye-balled" it.
- Zesty Italian dressing
- honey
- mustard
- seasoning: Tony's, Cavender's Greek seasoning, Montreal Steak seasoning

Directions:
1) Cover the chicken with the Italian dressing and seasoning.
2) Heat grill to a medium-high heat.
3) Grill chicken until fully cooked.
4) Right before taking the wings off the grill, mix up a little honey and mustard and brush it on the wings.
5) Voila!

  Get Cookin'!

Sunday, September 18, 2011

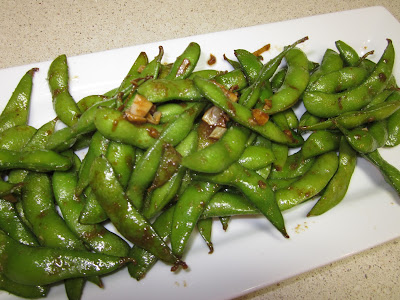
Roasted Garlic Edamame


One of our favorite sushi restaurants in Round Rock serves something very similar to this. We order it every time we go and pretty much lick the plate clean! Tonight we had an Asian-inspired meal so we had this for an appetizer. It was our first time to try to simulate what we order at the sushi restaurant and it turned out SO good! If you like regular edamame, you will LOVE this!! No need to dip each pod in soy sauce- the combination of the roasted garlic, teriyaki, and soy sauce is more than enough!

Ingredients:
- 1 bag of frozen edamame
- 4 cloves of garlic, finely chopped
- 2 teaspoons of olive oil
- 1 tablespoon of soy sauce
- 1 tablespoon of teriyaki sauce
- a sprinkle of garlic powder and sea salt

Directions:
1) Heat the olive oil on high in a skillet.
2) Steam the edamame in the microwave (follow directions on bag) for 3/4 of the time listed. Set aside.
3) Add the garlic to the pan and roast for a minute or two.
4) Add the soy sauce and teriyaki sauce- heat to high.
5) Add the edamame along with the garlic powder. Continue stirring until edamame is well coated and becomes a little bit crispy.
6) Remove from skillet and top with sea salt.
7) Voila!

  Get Cookin'!

Monday, July 18, 2011

Veggie Supreme Tostadas


I made these for a quick lunch today and I was quite surprised how good they were! I think the secret was in the beans. I did not just plop some beans on the tostadas straight out of the can. No way! Instead I heated them in a pan, added some milk and a little butter, and also a can of diced green chilies. I probably could have just eaten the refried beans right out of the pot! But I was able to control myself just long enough to plate up these tostadas. Another secret- I put a little bit of serrano pepper ranch dressing on top of the beans. Yummy!

I'm not sure why I am full of secrets today....

My toppings (but of course you can change this however! Or even add some ground beef or shredded chicken to make a quick and filling dinner.) :

- 1 can of refried beans (I added a little milk, butter, and a can of diced chilies to them)
- serrano pepper ranch dressing
- lettuce
- avocado
- cherry tomatoes
- sour cream
- shredded cheese
- cilantro

Simple, easy, quick, and delish! My 4 favorite things!

     Get Cookin'!

Saturday, July 2, 2011

Triple Threat Salsas!


I have been reading many different recipe blogs and websites to find some new creations to try. I have become quite addicted to the Kraft Food and Family website, and The Pioneer Woman Cooks food blog. Both of these are full of GREAT recipes that are simple and sound so yummy!       

Last night was "Mexican Date Night" in the Farque house. Often times we don't "go out" for dates. We stay in, listen to music, talk, and laugh -- all while celebrating life and cooking something delish together. It's my favorite kind of date! Ree Drummond (The Pioneer Woman) posted 2 homemade salsa recipes that I just had to try. Well I made a few changes to her recipes and BOTH are sooooo, sooooo good! If you are a chips and salsa addict like me, you must try these! They are super easy (each only taking about 5-10 minutes to make).

Below I have typed all three recipes. The guacamole recipe is a Farque family specialty!  


1) Guacamole!

Ingredients: Sorry about not giving exact measurements- it all depends on how many people you are making it for and your taste. Add/subtract to the amount of cilantro, lime, and onion to fit your pallet!

- fresh avocados (about 1 per person)
- juice from 1 fresh lime
- a handful of chopped, fresh cilantro 
- diced tomatoes
- salt and pepper to taste

Directions:
1) Put everything in a bowl, except the tomatoes, and mash with a potato masher until you reach the desired consistency.
2) Add tomatoes and stir with a spoon.
3) Voila!


2) Red Salsa! Until tonight, I was one jar away from NEVER buying/eating store-bought salsa again. Jason and I have wasted so many jars because we haven't found any that are worth eating! This recipe confirms that- I will never buy salsa again! This stuff is so easy to make and so full of flavor! The only drawback to this recipe is that it makes ALOT-- a huge bowl full! Next time I will scale it down a bit. But here is the full recipe:

Ingredients:
- 1 can of whole tomatoes with juice
- 1 can of original Rotel
- 1 can of mild Rotel
- 1/4 cup of chopped onion
- 1 clove of garlic, minced
- 1 whole, fresh jalapeno, sliced and chopped thin
- 1/2 cup of chopped cilantro
- 1/2 whole lime juice
- 1/4 teaspoon of sugar, salt, and cumin

Directions:
Combine everything in a large food processor. Pulse until you get the salsa to the consistency you'd like. Test seasonings and adjust as needed. Cover and refrigerate before serving. 


3) Fresh Corn and Avocado Salsa! I saved the BEST for last! This salsa is DELISH! Very light, colorful, and flavorful- perfect for a summer get - together!

Ingredients:
- 3 ears of fresh, sweet corn
- 2 very firm avocados (so when you cut them they don't turn to mush)
- 1/2 cup of diced red onion
- 1 diced red bell pepper
- 1 jalapeno, seeded and finely diced
- a good handful of chopped cilantro
- juice from 1 whole lime
- a few good squirts of Light Italian Dressing
- salt and pepper to taste

Directions:
Slice kernels off the corn and combine with all remaining ingredients. Cover and refrigerate before serving.


All three of these are oh, so delish! Do you have any family - favorite salsas? Please share them!

    Get Cookin'!

Thursday, June 2, 2011

Bacon Wrapped Jalapeno Poppers

If you like jalapenos, you will LOVE these! But before I go any further, I have to admit that I stole this creation idea from a friend- I know he won't mind me sharing! There is a little prep work involved in the process, but it's SO worth it!

1) Mix together the ingredients for the stuffing and set aside. The stuffing consists of:
     - a small block of cream cheese, softened
     - about 1/2 cup of shredded cheddar cheese
     - diced green onions

2) Wash the jalapenos. Cut off the top and use a butter knife to take the seeds out. To seed the jalapenos, carefully turn the knife around and around the inside of the pepper. The seeds will break free and you will be able to shake them out.Be careful not to split the jalapenos because the stuffing will ooze out. Here's a picture of how you should seed the peppers:

Here is a picture of what the seeded pepper should look like: (HINT: If there are a few seeds that are stuck on the inside, just wash them out with water. You really want to get all of the seeds out, or else these poppers will be too spicy to enjoy.)

3) After all the peppers are seeded, grill them for a few minutes until they turn a little black. 

4) Take the peppers off the grill. Use a small knife to stuff the peppers with the mixture. Wrap each pepper in bacon, covering the top of the pepper with an end of the bacon (this will help keep the mixture from oozing out all over the grill). Use a skewer to keep the bacon in place. We like to sprinkle a little pepper on the bacon before grilling- it really helps bring out the flavor!

5) Grill the poppers until the bacon is cooked, turning frequently. Here is a picture of the peppers right off the grill- they are still on the grill pan because we just couldn't wait to start eating them!


Try this and let me know what you think!

     Get Cookin'!

Sunday, May 29, 2011

Jalapeno Sliders

To celebrate Memorial Day, I wanted to share a new grilling recipe we created that's great for company! I have to give 100% of the credit for this recipe to Jason. It was totally his idea! We call them "sliders" instead of "burgers" because we make 4 or 5 patties out of 1 pound of ground beef. To give them a little extra kick, Jason seeded a fresh jalapeno, diced it up, and mixed it into the beef. We just love spicy food and so we add jalapenos to just about everything! As I'm sure you know, all of the heat of a jalapeno comes from the seeds. So if you remove all of the seeds, the jalapeno tastes similar to a bell pepper. We wanted to have a hint of spice so along with the diced jalapeno, we added a few of the seeds back into the beef.

We marinate the ground beef for about 15-20 minutes in the following:
- Worcestershire Sauce
- Garlic Powder
- Tony's
- Montreal Steak Seasoning (LOVE this stuff!!!!)
- Black Pepper

Then he grilled the burgers until they were fully cooked. Here is a picture of the patties right off the grill:


You can see the pieces of jalapeno and the seeds! These sliders are so good- try them and you will see!

     Get Cookin'!

Saturday, May 28, 2011

Happy FRYday!

Ok, ok...I know it's Saturday! I wanted to post this yesterday but after a long day at school, cooking, and cleaning..I just fell asleep! Last night we fried some fresh, yellow squash and a sweet onion for an appetizer. We have done this before but I think this time was the best! We tried buttermilk (instead of regular milk) and a new batter- Vidalia Brand Sweet Onion. Buttermilk is a little bit thicker than regular milk, so the batter sticks to the vegetables a lot better. It looks like this:

We cut the squash and onion into rings, dipped them in buttermilk, and then into the batter mix. Note: This is not what it said to do in the directions on the back of the box! From experience, we have learned to just use milk and the batter mix, and we add some of our own seasoning to the mix. We fried them in a deep fryer at about 375 degrees for 7-10 minutes (or until golden brown). To make this tasty appetizer even more delish, we served it with a side of serrano pepper ranch dipping sauce! Oh, so good! 


     Get Cookin'!